If a student withdraws from your school, FACTS recommends following specific steps in Tuition Management to ensure your customer records and reports are accurate. These steps may vary depending on your institution’s withdrawal policy, internal processes, or accounting practices. (A note for Premier Integration users: If your school is using Premier Integration, you will need to complete additional steps in the SIS when withdrawing a student. The following information is specific to handling the financial portion of a student withdrawal).
Information Needed About the Student Withdrawing
- Is there a balance still owed or a refund due? If a balance is owed, you will need to determine how much is remaining from the balance on their FACTS account.
- If a refund is due, you will record an institution issued refund as part of the withdrawal process.
- If a refund is due for the student withdrawing and there is an additional student with a balance still owed, you also have the option to transfer the funds to the balance owed for the remaining student.
- Do the credits and charges on the account need to be removed or reduced (prorated)? Credits include any multi-child discounts, scholarships, etc.
- If the credits or charges need to be removed or reduced, you will perform corrections to the transactions on the account as part of the withdrawal process.
Navigation
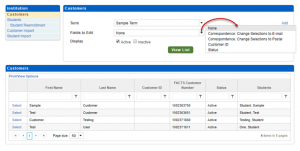
- Click Roster on the top navigation bar.
- Click Select next to the appropriate customer.
- Click Service Agreement.
If you are not sure which transactions are on the record for the student, you can review the charges, credits, payments, and balances on the Customer Profile before selecting Service Agreement. The Balances with Adjustment Detail Report is also helpful when trying to review the student’s balance details.
Recommended Steps
- Determine if a refund is owed. If yes, record the refund or transfer the funds to a remaining balance owed for additional sibling(s) on the account.
- Select Record an Institution Issued Refund or Transfer Funds from the service options.
- Recording a refund on the system updates your FACTS reports, but you will still need to issue a check to the family. Refunds decrease the amount paid, which will increase the remaining balance. You may need to perform corrections to remove the balance if it is not owed.
- After recording the refund or transferring funds (when applicable), correct credits and charges.
- Select Correction from the service options. It’s a best practice to correct all credits first, then charges.
- Once the student has withdrawn and any remaining balance has been paid in full, terminate the agreement. Termination of the agreement is final. Once terminated, the agreement cannot be reactivated.
- Select Change Agreement Status from the service options or select Change Status from the customer profile.
- If a balance is still owed, do not terminate the agreement. Terminating it will stop all scheduled payments from processing.
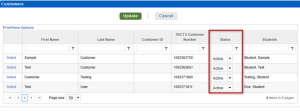
- Once the agreement has been terminated you will also want to inactivate the student or customer so they no longer appear in the roster.
- On the Customer Profile, select the student’s name, then change their status to Inactive. If there are no remaining students at your school, you can select the customer’s name instead and change their status to inactive. Inactivating the customer will inactivate all students on their record.
If Using Incidental Billing or Prepay Accounts
You can use the Service Billing option or Service Prepays option to record a refund, transfer funds, or perform corrections to the Incidental Billing or Prepay transactions. Incidental Billing activity can be terminated by selecting Change Status next to the Incidental Expenses on the Customer Profile. Prepay activity cannot be terminated.
Additional Information About Inactivating a Record
- Inactivating the student prevents you from adding transactions to their record in error on the billing admin page when sending incidental bills and the mass entry screen when adding transactions for Prepay Accounts. You will still be able to manually add transactions from the Customer Profile page.
- Inactivating the student or customer prevents their information from rolling forward to the new school year if you utilize electronic reenrollment.
- Inactivating the customer or student does not stop payments from processing. You must change the agreement status to stop future payments.
To learn more about withdrawing students, visit this HubHelp article.